> ## Documentation Index
> Fetch the complete documentation index at: https://docs.honeyhive.ai/llms.txt
> Use this file to discover all available pages before exploring further.
# Using Server-Side Evaluators
> Run experiments using server-side HoneyHive evaluators
In the [experiments Quickstart](/evaluation/quickstart), you learned how to run an experiment using client-side evaluators executed directly within your application's environment.
This guide focuses on utilizing server-side evaluators powered by HoneyHive's infrastructure.
Server-side evaluators offer several advantages, particularly for resource-intensive or asynchronous tasks, as they are centralized, scalable, and versioned.
If you want to know more about the differences between client-side and server-side evaluators, refer to the [Evaluator Introduction](/evaluators/introduction) page.
## Full code
Below is a minimal example demonstrating how to run an experiment using server-side evaluators:
```python theme={null}
from honeyhive import evaluate, evaluator
import os
from openai import OpenAI
import random
openai_client = OpenAI(api_key=os.environ["OPENAI_API_KEY"])
# Create function to be evaluated
# inputs -> parameter to which datapoint or json value will be passed
# (optional) ground_truths -> ground truth value for the input
def function_to_evaluate(inputs, ground_truths):
completion = openai_client.chat.completions.create(
model="gpt-4o",
messages=[
{"role": "system", "content": f"You are an expert analyst specializing in {inputs['product_type']} market trends."},
{"role": "user", "content": f"Could you provide an analysis of the current market performance and consumer reception of {inputs['product_type']} in {inputs['region']}? Please include any notable trends or challenges specific to this region."}
]
)
# Output -> session output
return completion.choices[0].message.content
dataset = [
{
"inputs": {
"product_type": "electric vehicles",
"region": "western europe",
"time_period": "first half of 2023",
"metric_1": "total revenue",
"metric_2": "market share"
},
"ground_truths": {
"response": "As of 2023, the electric vehicle (EV) market in Western Europe is experiencing significant growth, with the region maintaining its status as a global leader in EV adoption. [continue...]",
}
},
{
"inputs": {
"product_type": "gaming consoles",
"region": "north america",
"time_period": "holiday season 2022",
"metric_1": "units sold",
"metric_2": "gross profit margin"
},
"ground_truths": {
"response": "As of 2023, the gaming console market in North America is characterized by intense competition, steady consumer demand, and evolving trends influenced by technological advancements and changing consumer preferences. [continue...]",
}
},
{
"inputs": {
"product_type": "smart home devices",
"region": "australia and new zealand",
"time_period": "fiscal year 2022-2023",
"metric_1": "customer acquisition cost",
"metric_2": "average revenue per user"
},
"ground_truths": {
"response": "As of 2023, the market for smart home devices in Australia and New Zealand is experiencing robust growth, driven by increasing consumer interest in home automation and the enhanced convenience and security these devices offer. [continue...]",
}
},
]
if __name__ == "__main__":
# Run experiment
evaluate(
function = function_to_evaluate, # Function to be evaluated
hh_api_key = '',
hh_project = '',
name = 'Sample Experiment',
dataset = dataset, # to be passed for json_list
)
```
## Running an experiment
**Prerequisites**
* You have already created a project in HoneyHive, as explained [here](/workspace/projects).
* You have an API key for your project, as explained [here](/sdk-reference/authentication).
***Expected Time***: 5 minutes
**Steps**
Let's create our dataset by inputting data directly into our code using a list of JSON objects:
```python theme={null}
dataset = [
{
"inputs": {
"product_type": "electric vehicles",
"region": "western europe",
},
"ground_truths": {
"response": "As of 2023, the electric vehicle (EV) ... ",
}
},
{
"inputs": {
"product_type": "gaming consoles",
"region": "north america",
},
"ground_truths": {
"response": "As of 2023, the gaming console market ... ",
}
},
{
"inputs": {
"product_type": "smart home devices",
"region": "australia and new zealand",
},
"ground_truths": {
"response": "As of 2023, the market for smart home devices in Australia and New Zealand ... ",
}
},
]
```
The `inputs` and `ground_truths` fields will be accessible in both the function we want to evaluate and the evaluator function, as we will see below.
Define the function you want to evaluate:
```python theme={null}
def function_to_evaluate(inputs, ground_truths):
completion = openai_client.chat.completions.create(
model="gpt-4o",
messages=[
{"role": "system", "content": f"You are an expert analyst specializing in {inputs['product_type']} market trends."},
{"role": "user", "content": f"Could you provide an analysis of the current market performance and consumer reception of {inputs['product_type']} in {inputs['region']}? Please include any notable trends or challenges specific to this region."}
]
)
# Output -> session output
return completion.choices[0].message.content
```
* `inputs` is a dictionary with the parameters used in your function, as defined in our dataset.
* The value returned by the function would map to the `outputs` field of each run in the experiment and will be accessible to your evaluator function, as we will see below.
* `ground_truths` is an optional field and, as the name suggests, contains the ground truth for each set of inputs.
Let's create a server-side Python evaluator that will simply measure the length of the model's response.
This evaluator will specifically work with events of type "model", which represent LLM completions in your application:
1. Navigate to the [**Evaluators**](https://app.us.honeyhive.ai/metrics) tab in the HoneyHive console.
2. Click `Add Evaluator` and select `Python Evaluator`.
You can find more information about server-side Python evaluators [here](/evaluators/python).
When creating server-side evaluators, you'll work with span attributes that are automatically passed to your evaluator function through the `event` dictionary parameter, such as `inputs`, `outputs`, or `metadata`.
For our Response Length evaluator, we are interested in the model's response, which we'll access using the `event["outputs"]["content"]` path:
```python theme={null}
def metric_name(event):
"""
Response Length Metric
Counts the number of words in the model's output. Useful for measuring verbosity,
controlling output length, and monitoring response size.
Args:
event (dict): Dictionary containing model output (and potentially other fields).
- event["outputs"]["content"] (str): The model's text output.
Returns:
int: The total number of words in the model's response.
"""
model_response = event["outputs"]["content"] # Replace this based on your specific event attributes
# Split response into words and count them
# Note: This is a simple implementation. Consider using NLTK or spaCy for more accurate tokenization.
model_words = model_response.split(" ")
return len(model_words)
```
You can find more information on model events and their properties [here](/schema-overview#model-events).
Finally, you can run your experiment with `evaluate`:
```python theme={null}
from honeyhive import evaluate
from your_module import function_to_evaluate
if __name__ == "__main__":
evaluate(
function = function_to_evaluate,
hh_api_key = '',
hh_project = '',
name = 'Sample Experiment',
dataset = dataset, # to be passed for code-managed datasets
# You can also provide client-side evaluators if they are already set up.
# evaluators=[sample_evaluator, ...]
)
```
## Dashboard View
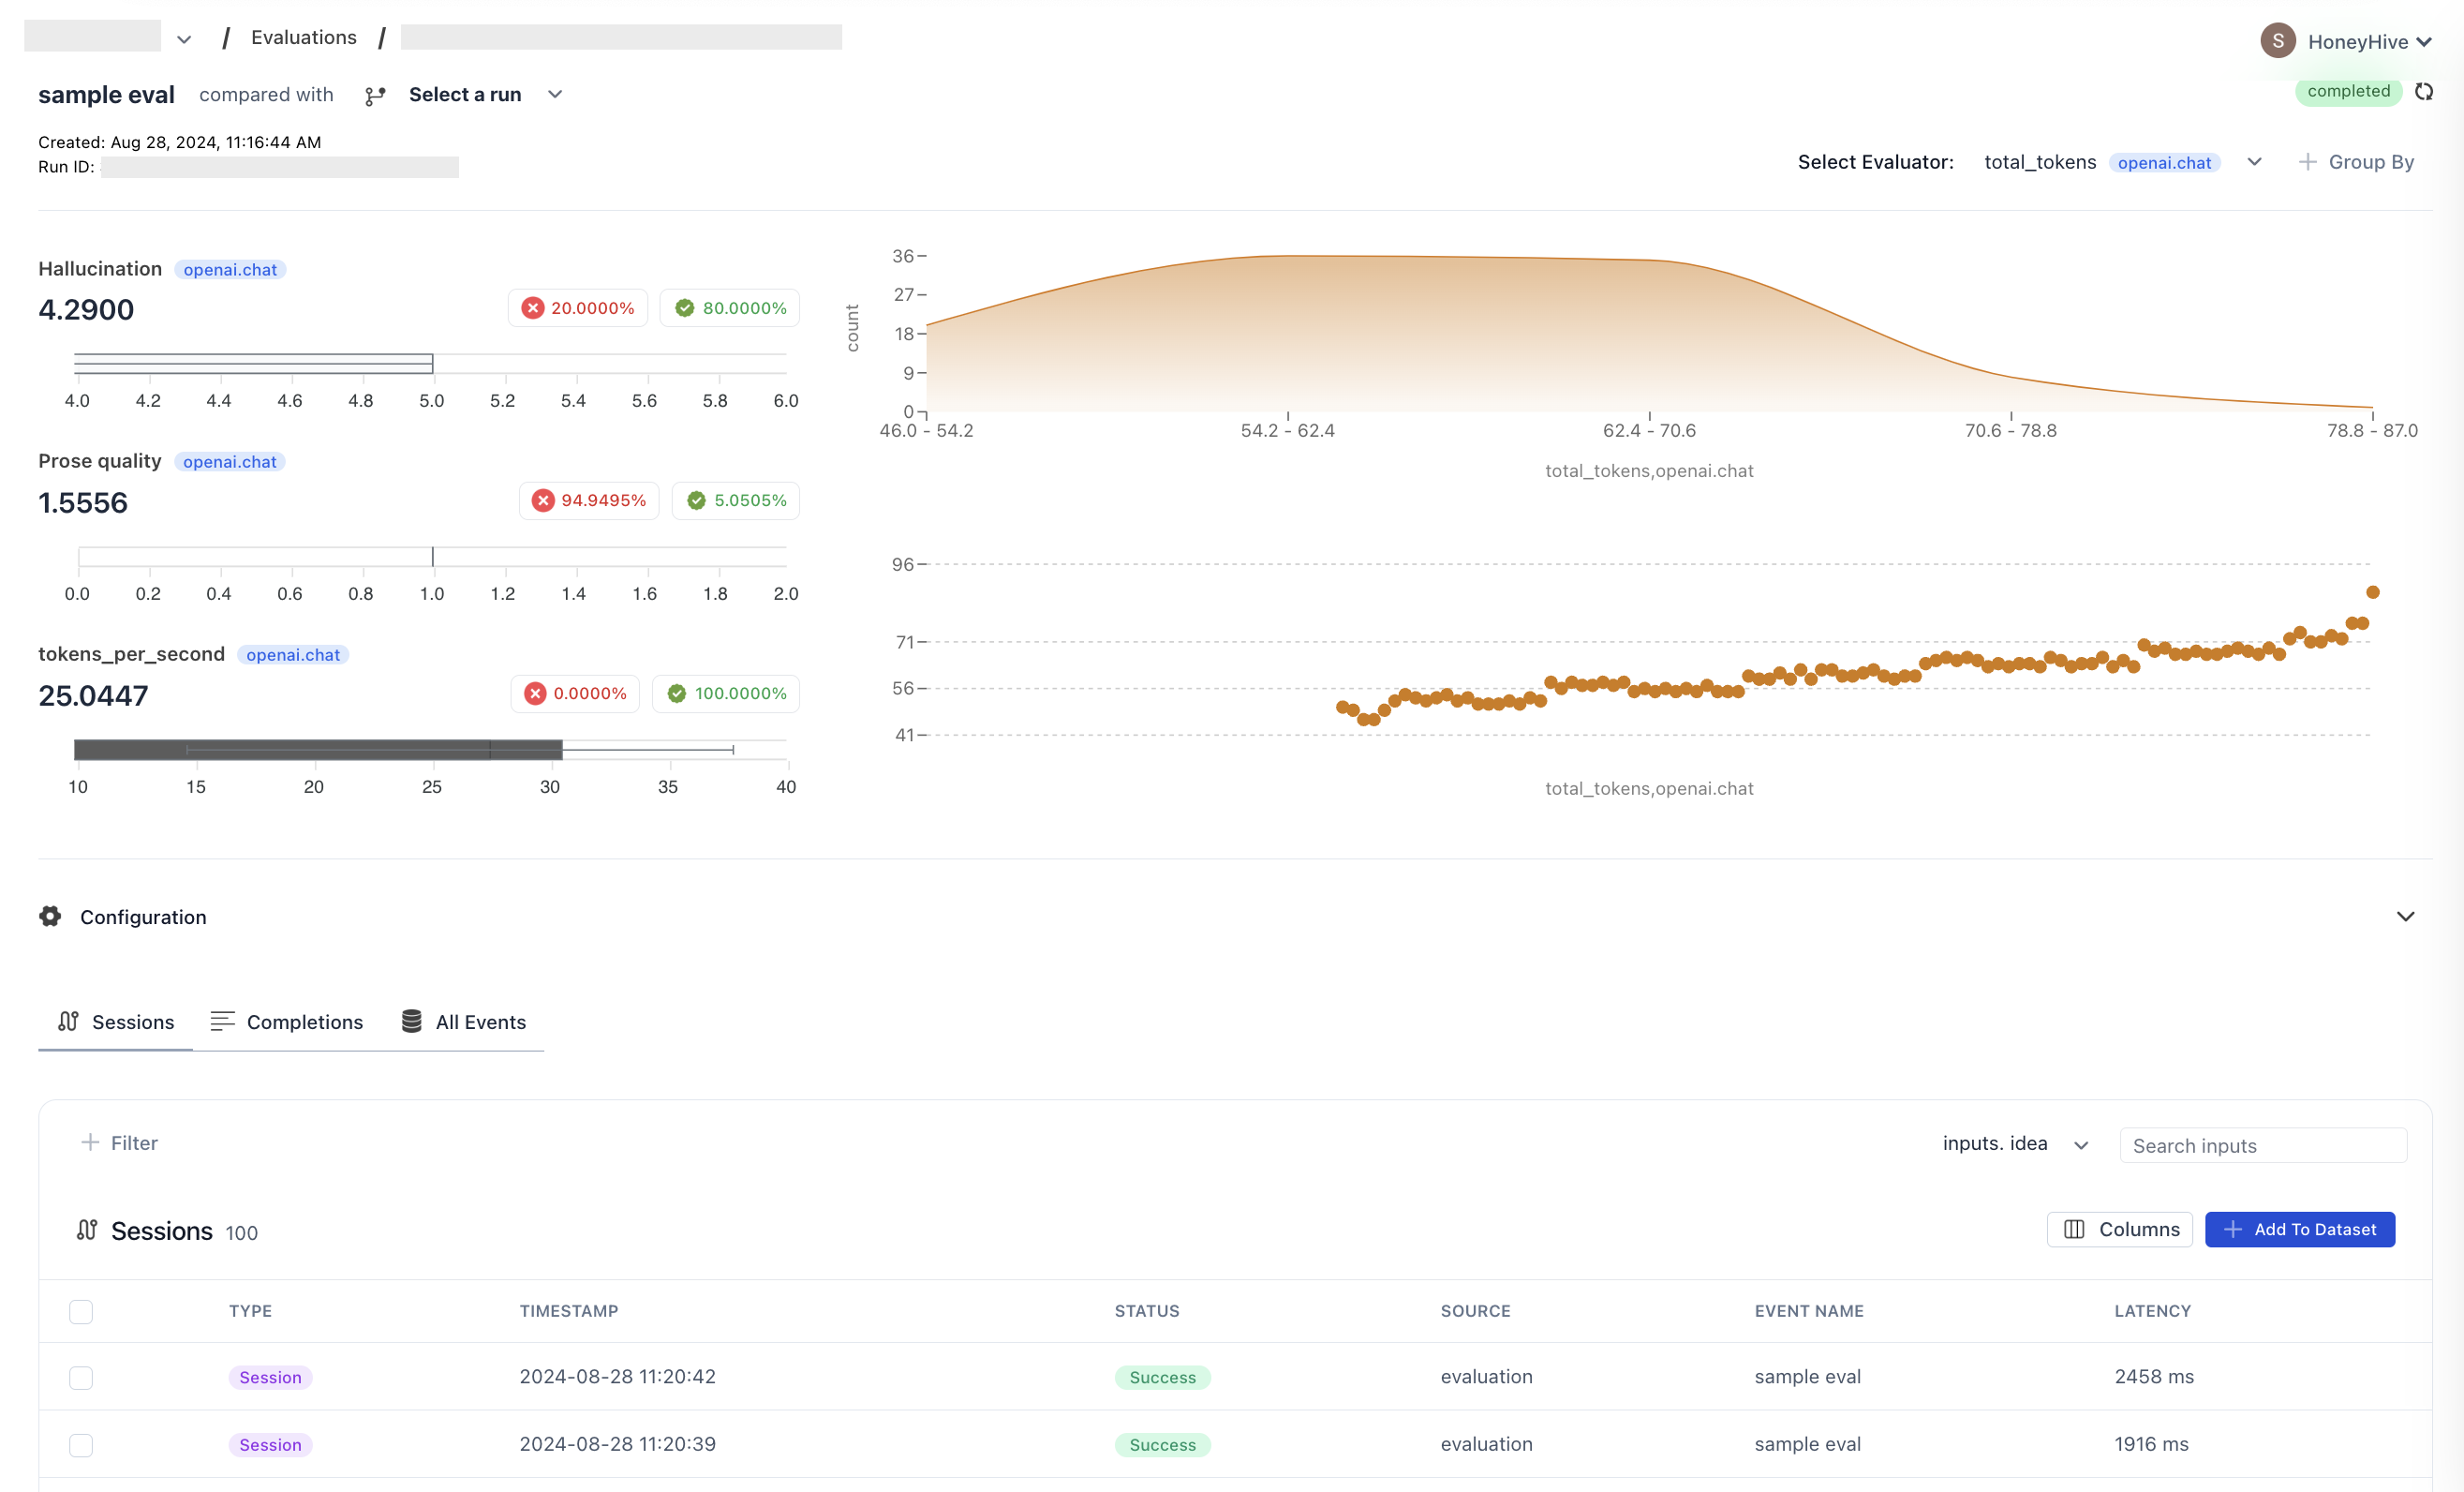
You should now be able to see the `Response Length` metric in your dashboard. Note that even though we didn't
pass any local evaluators when running `evaluate`, our server-side evaluator was properly configured and executed.
 ## Conclusion
By following these steps, you can set up and run experiments using server-side HoneyHive evaluators.
This allows you to systematically test your LLM-based systems across various scenarios and collect performance data for analysis while providing a consistent, centralized approach to deployment, management, and versioning across environments.
## Full code
Here's a minimal example to get you started with experiments in HoneyHive:
```typescript theme={null}
import { evaluate } from "honeyhive";
import { OpenAI } from 'openai';
const openai = new OpenAI({ apiKey: process.env.OPENAI_KEY });
// Create function to be evaluated
// input -> parameter to which datapoint or json value will be passed
export async function functionToEvaluate(input: Record) {
try {
const response = await openai.chat.completions.create({
model: "gpt-4",
messages: [
{
role: 'system',
content: `You are an expert analyst specializing in ${input.product_type} market trends.`
},
{
role: 'user',
content: `Could you provide an analysis of the current market performance and consumer reception of ${input.product_type} in ${input.region}? Please include any notable trends or challenges specific to this region.`
}
],
});
// Output -> session output
return response.choices[0].message;
} catch (error) {
console.error('Error making GPT-4 call:', error);
throw error;
}
}
const dataset = [
{
"product_type": "electric vehicles",
"region": "western europe",
"time_period": "first half of 2023",
"metric_1": "total revenue",
"metric_2": "market share"
},
{
"product_type": "gaming consoles",
"region": "north america",
"time_period": "holiday season 2022",
"metric_1": "units sold",
"metric_2": "gross profit margin"
},
{
"product_type": "smart home devices",
"region": "australia and new zealand",
"time_period": "fiscal year 2022-2023",
"metric_1": "customer acquisition cost",
"metric_2": "average revenue per user"
}
]
evaluate({
evaluationFunction: functionToEvaluate, // Function to be evaluated
hh_api_key: '',
hh_project: '',
name: 'Sample Experiment',
dataset: dataset // to be passed for json_list
})
```
## Running an experiment
**Prerequisites**
* You have already created a project in HoneyHive, as explained [here](/workspace/projects).
* You have an API key for your project, as explained [here](/sdk-reference/authentication).
***Expected Time***: 5 minutes
**Steps**
Let's create our dataset by inputting data directly into our code using a list of JSON objects:
```typescript theme={null}
const dataset = [
{
"parameter_1": "electric vehicles",
"parameter_2": "western europe"
},
{
"parameter_1": "gaming consoles",
"parameter_2": "north america"
},
{
"parameter_1": "smart home devices",
"parameter_2": "australia and new zealand"
}
]
```
The input fields in the dataset should map to the fields mapped in the `evaluate` function.
Define the function you want to evaluate in your experiment:
```typescript theme={null}
// Create function to be evaluated
export async function functionToEvaluate(input: Record) {
try {
const response = await openai.chat.completions.create({
model: "gpt-4",
messages: [
{
role: 'system',
content: `You are an expert analyst specializing in ${input.product_type} market trends.`
},
{
role: 'user',
content: `Could you provide an analysis of the current market performance and consumer reception of ${input.product_type} in ${input.region}? Please include any notable trends or challenges specific to this region.`
}
],
});
// Output -> session output
return response.choices[0].message;
} catch (error) {
console.error('Error making GPT-4 call:', error);
throw error;
}
}
```
The value returned by the function would map to the `outputs` field of each run in the experiment.
Let's create a server-side Python evaluator that will simply measure the length of the model's response. We will:
1. Navigate to the [**Evaluators**](https://app.us.honeyhive.ai/metrics) tab in the HoneyHive console.
2. Click `Add Evaluator` and select `Python Evaluator`.
## Conclusion
By following these steps, you can set up and run experiments using server-side HoneyHive evaluators.
This allows you to systematically test your LLM-based systems across various scenarios and collect performance data for analysis while providing a consistent, centralized approach to deployment, management, and versioning across environments.
## Full code
Here's a minimal example to get you started with experiments in HoneyHive:
```typescript theme={null}
import { evaluate } from "honeyhive";
import { OpenAI } from 'openai';
const openai = new OpenAI({ apiKey: process.env.OPENAI_KEY });
// Create function to be evaluated
// input -> parameter to which datapoint or json value will be passed
export async function functionToEvaluate(input: Record) {
try {
const response = await openai.chat.completions.create({
model: "gpt-4",
messages: [
{
role: 'system',
content: `You are an expert analyst specializing in ${input.product_type} market trends.`
},
{
role: 'user',
content: `Could you provide an analysis of the current market performance and consumer reception of ${input.product_type} in ${input.region}? Please include any notable trends or challenges specific to this region.`
}
],
});
// Output -> session output
return response.choices[0].message;
} catch (error) {
console.error('Error making GPT-4 call:', error);
throw error;
}
}
const dataset = [
{
"product_type": "electric vehicles",
"region": "western europe",
"time_period": "first half of 2023",
"metric_1": "total revenue",
"metric_2": "market share"
},
{
"product_type": "gaming consoles",
"region": "north america",
"time_period": "holiday season 2022",
"metric_1": "units sold",
"metric_2": "gross profit margin"
},
{
"product_type": "smart home devices",
"region": "australia and new zealand",
"time_period": "fiscal year 2022-2023",
"metric_1": "customer acquisition cost",
"metric_2": "average revenue per user"
}
]
evaluate({
evaluationFunction: functionToEvaluate, // Function to be evaluated
hh_api_key: '',
hh_project: '',
name: 'Sample Experiment',
dataset: dataset // to be passed for json_list
})
```
## Running an experiment
**Prerequisites**
* You have already created a project in HoneyHive, as explained [here](/workspace/projects).
* You have an API key for your project, as explained [here](/sdk-reference/authentication).
***Expected Time***: 5 minutes
**Steps**
Let's create our dataset by inputting data directly into our code using a list of JSON objects:
```typescript theme={null}
const dataset = [
{
"parameter_1": "electric vehicles",
"parameter_2": "western europe"
},
{
"parameter_1": "gaming consoles",
"parameter_2": "north america"
},
{
"parameter_1": "smart home devices",
"parameter_2": "australia and new zealand"
}
]
```
The input fields in the dataset should map to the fields mapped in the `evaluate` function.
Define the function you want to evaluate in your experiment:
```typescript theme={null}
// Create function to be evaluated
export async function functionToEvaluate(input: Record) {
try {
const response = await openai.chat.completions.create({
model: "gpt-4",
messages: [
{
role: 'system',
content: `You are an expert analyst specializing in ${input.product_type} market trends.`
},
{
role: 'user',
content: `Could you provide an analysis of the current market performance and consumer reception of ${input.product_type} in ${input.region}? Please include any notable trends or challenges specific to this region.`
}
],
});
// Output -> session output
return response.choices[0].message;
} catch (error) {
console.error('Error making GPT-4 call:', error);
throw error;
}
}
```
The value returned by the function would map to the `outputs` field of each run in the experiment.
Let's create a server-side Python evaluator that will simply measure the length of the model's response. We will:
1. Navigate to the [**Evaluators**](https://app.us.honeyhive.ai/metrics) tab in the HoneyHive console.
2. Click `Add Evaluator` and select `Python Evaluator`.
You can have more information about server-side Python evaluators [here](/evaluators/python).
```typescript theme={null}
import { evaluate } from "honeyhive";
import { functionToEvaluate } from "./your-module";
evaluate({
evaluationFunction: functionToEvaluate, // Direct reference since signature matches
hh_api_key: '',
hh_project: '',
name: 'Sample Experiment',
dataset: dataset, // to be passed for json_list
})
```
## Dashboard View
You should now be able to see the `Response Length` metric in your dashboard. Note that even though we didn't
pass any local evaluators when running `evaluate`, our server-side evaluator was properly configured and executed.
## Conclusion
By following these steps, you can set up and run experiments using server-side HoneyHive evaluators.
This allows you to systematically test your LLM-based systems across various scenarios and collect performance data for analysis while providing a consistent, centralized approach to deployment, management, and versioning across environments.