> ## Documentation Index
> Fetch the complete documentation index at: https://docs.honeyhive.ai/llms.txt
> Use this file to discover all available pages before exploring further.
# How to Run Your First HoneyHive Experiment
> Run your first HoneyHive experiment in 5 minutes: define a function, score outputs with an evaluator, and compare results in the Experiments dashboard.
You will run an offline experiment with `evaluate()`: execute a function on a test dataset, score each output with a custom evaluator, and review aggregated results in the HoneyHive Experiments dashboard. For the full evaluation model, see [evaluation introduction](/v2/evaluation/introduction).
**Time:** \~5 minutes
***
## Step 1: Set up dependencies and credentials
Install dependencies and configure your environment:
```bash theme={null}
pip install honeyhive openai
```
Go to [**Settings > Project > API Keys**](https://app.us.honeyhive.ai/settings/project/keys) and click **Create API Key**. Copy the key from the modal - it will only be shown once.
Set your environment variables:
```bash theme={null}
export HH_API_KEY="your-honeyhive-api-key"
export OPENAI_API_KEY="your-openai-api-key"
```
```python theme={null}
from openai import OpenAI
from honeyhive import evaluate
client = OpenAI()
```
If you have existing code with `HoneyHiveTracer.init()`, you don't need it here - `evaluate()` handles tracing automatically.
***
## Step 2: Define the function to evaluate
Write the function you want to evaluate. Here we'll build an intent classifier:
```python theme={null}
def classify_intent(datapoint):
text = datapoint["inputs"]["text"]
response = client.chat.completions.create(
model="gpt-4o-mini",
messages=[{"role": "user", "content": f"""Classify this customer support message into ONE category:
- billing: payment issues, invoices, charges, refunds
- technical: bugs, errors, how to use features
- account: login, password, profile, settings
- general: other questions, feedback
Reply with ONLY the category name.
Message: {text}
Category:"""}],
temperature=0
)
return {"intent": response.choices[0].message.content.strip().lower()}
```
***
## Step 3: Create a test dataset
Define test cases with inputs and expected outputs:
```python theme={null}
dataset = [
{
"inputs": {"text": "I was charged twice for my subscription this month."},
"ground_truth": {"intent": "billing"}
},
{
"inputs": {"text": "The export button isn't working. Getting error code 500."},
"ground_truth": {"intent": "technical"}
},
{
"inputs": {"text": "I forgot my password and the reset email never arrived."},
"ground_truth": {"intent": "account"}
},
{
"inputs": {"text": "Just wanted to say your support team was amazing. Thanks!"},
"ground_truth": {"intent": "general"}
},
]
```
***
## Step 4: Write an evaluator
Evaluators score your function's outputs against ground truth:
```python theme={null}
def intent_match(outputs, inputs, ground_truth):
"""Check if the classified intent matches expected."""
actual = outputs.get("intent", "").lower()
expected = ground_truth.get("intent", "").lower()
return 1.0 if actual == expected else 0.0
```
**Evaluator signature:** `(outputs, inputs, ground_truth)`. Returns a score (typically 0.0 to 1.0). This evaluator runs in your own code during `evaluate()`, with no server-side setup.
***
## Step 5: Run the experiment
Run the experiment with `evaluate()`:
```python theme={null}
result = evaluate(
function=classify_intent,
dataset=dataset,
evaluators=[intent_match],
name="intent-classifier-v1"
)
```
You'll see a results table printed to the console with scores for each datapoint.
***
## Step 6: View results in the dashboard
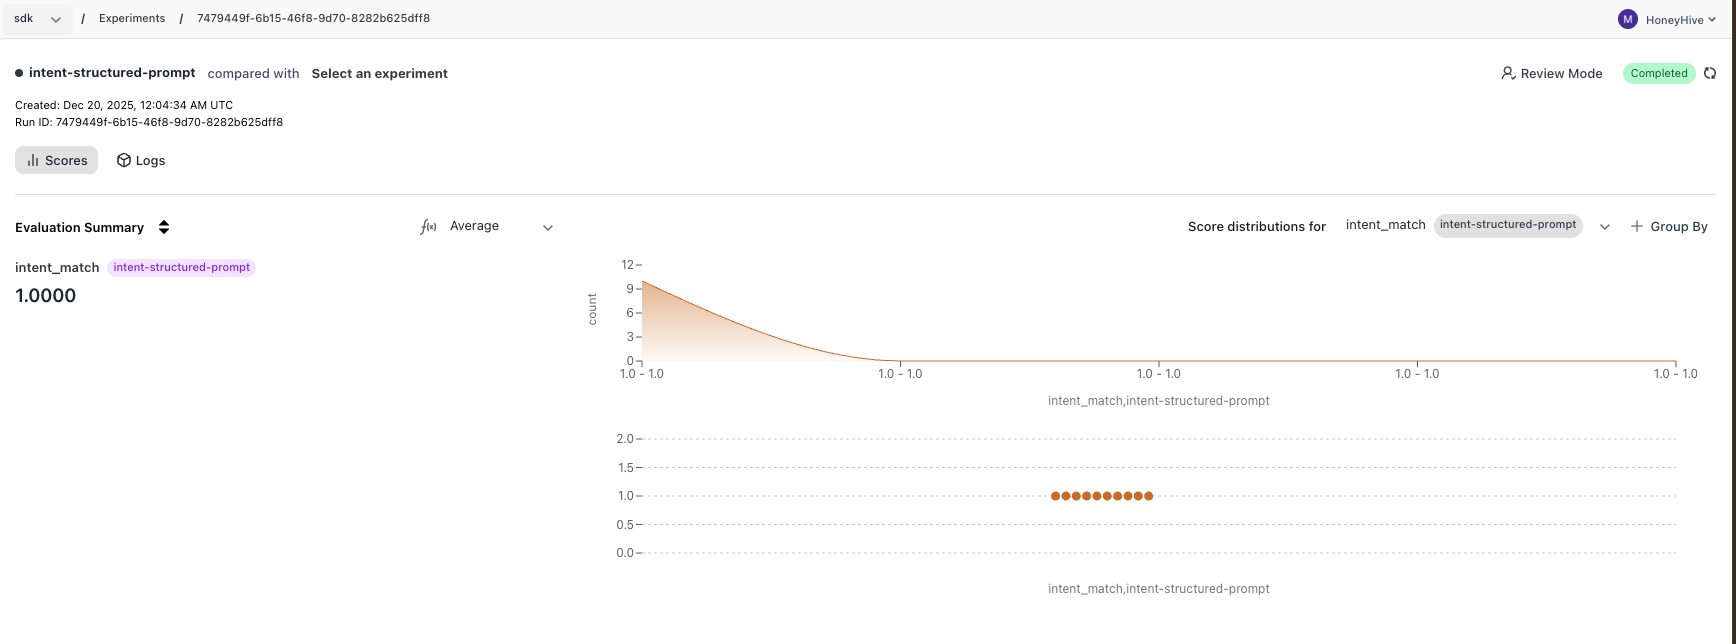
Go to [app.us.honeyhive.ai](https://app.us.honeyhive.ai) and open **Experiments** to see your run, scores, and individual traces.
 ***
First, set your environment variables:
```bash theme={null}
export HH_API_KEY="your-honeyhive-api-key"
export OPENAI_API_KEY="your-openai-api-key"
```
```python theme={null}
from openai import OpenAI
from honeyhive import evaluate
client = OpenAI()
def classify_intent(datapoint):
text = datapoint["inputs"]["text"]
response = client.chat.completions.create(
model="gpt-4o-mini",
messages=[{"role": "user", "content": f"""Classify this customer support message into ONE category:
- billing: payment issues, invoices, charges, refunds
- technical: bugs, errors, how to use features
- account: login, password, profile, settings
- general: other questions, feedback
Reply with ONLY the category name.
Message: {text}
Category:"""}],
temperature=0
)
return {"intent": response.choices[0].message.content.strip().lower()}
dataset = [
{"inputs": {"text": "I was charged twice for my subscription this month."}, "ground_truth": {"intent": "billing"}},
{"inputs": {"text": "The export button isn't working. Getting error code 500."}, "ground_truth": {"intent": "technical"}},
{"inputs": {"text": "I forgot my password and the reset email never arrived."}, "ground_truth": {"intent": "account"}},
{"inputs": {"text": "Just wanted to say your support team was amazing. Thanks!"}, "ground_truth": {"intent": "general"}},
]
def intent_match(outputs, inputs, ground_truth):
return 1.0 if outputs.get("intent", "").lower() == ground_truth.get("intent", "").lower() else 0.0
result = evaluate(
function=classify_intent,
dataset=dataset,
evaluators=[intent_match],
name="intent-classifier-v1"
)
```
***
## What did you learn?
* **Define a function** that receives a datapoint and returns outputs
* **Create a dataset** with inputs and ground truths
* **Write an evaluator** that scores outputs automatically
* **Run an experiment** with `evaluate()` and view results in the dashboard
`evaluate()` traces each datapoint automatically, so you do not need a separate [tracer setup](/v2/tracing/tracer-initialization) for experiments.
***
## What should you do next?
Run a second experiment with a different prompt and compare results side-by-side
Code evaluators, LLM-as-judge, and human review
Reuse datasets stored in HoneyHive with `dataset_id`
Run evaluators on HoneyHive infrastructure
***
First, set your environment variables:
```bash theme={null}
export HH_API_KEY="your-honeyhive-api-key"
export OPENAI_API_KEY="your-openai-api-key"
```
```python theme={null}
from openai import OpenAI
from honeyhive import evaluate
client = OpenAI()
def classify_intent(datapoint):
text = datapoint["inputs"]["text"]
response = client.chat.completions.create(
model="gpt-4o-mini",
messages=[{"role": "user", "content": f"""Classify this customer support message into ONE category:
- billing: payment issues, invoices, charges, refunds
- technical: bugs, errors, how to use features
- account: login, password, profile, settings
- general: other questions, feedback
Reply with ONLY the category name.
Message: {text}
Category:"""}],
temperature=0
)
return {"intent": response.choices[0].message.content.strip().lower()}
dataset = [
{"inputs": {"text": "I was charged twice for my subscription this month."}, "ground_truth": {"intent": "billing"}},
{"inputs": {"text": "The export button isn't working. Getting error code 500."}, "ground_truth": {"intent": "technical"}},
{"inputs": {"text": "I forgot my password and the reset email never arrived."}, "ground_truth": {"intent": "account"}},
{"inputs": {"text": "Just wanted to say your support team was amazing. Thanks!"}, "ground_truth": {"intent": "general"}},
]
def intent_match(outputs, inputs, ground_truth):
return 1.0 if outputs.get("intent", "").lower() == ground_truth.get("intent", "").lower() else 0.0
result = evaluate(
function=classify_intent,
dataset=dataset,
evaluators=[intent_match],
name="intent-classifier-v1"
)
```
***
## What did you learn?
* **Define a function** that receives a datapoint and returns outputs
* **Create a dataset** with inputs and ground truths
* **Write an evaluator** that scores outputs automatically
* **Run an experiment** with `evaluate()` and view results in the dashboard
`evaluate()` traces each datapoint automatically, so you do not need a separate [tracer setup](/v2/tracing/tracer-initialization) for experiments.
***
## What should you do next?
Run a second experiment with a different prompt and compare results side-by-side
Code evaluators, LLM-as-judge, and human review
Reuse datasets stored in HoneyHive with `dataset_id`
Run evaluators on HoneyHive infrastructure