> ## Documentation Index
> Fetch the complete documentation index at: https://docs.honeyhive.ai/llms.txt
> Use this file to discover all available pages before exploring further.
# Managing Prompts
> Create, test, version, and manage prompts in the HoneyHive Playground. Iterate on templates, compare models, and deploy prompt versions to your projects.
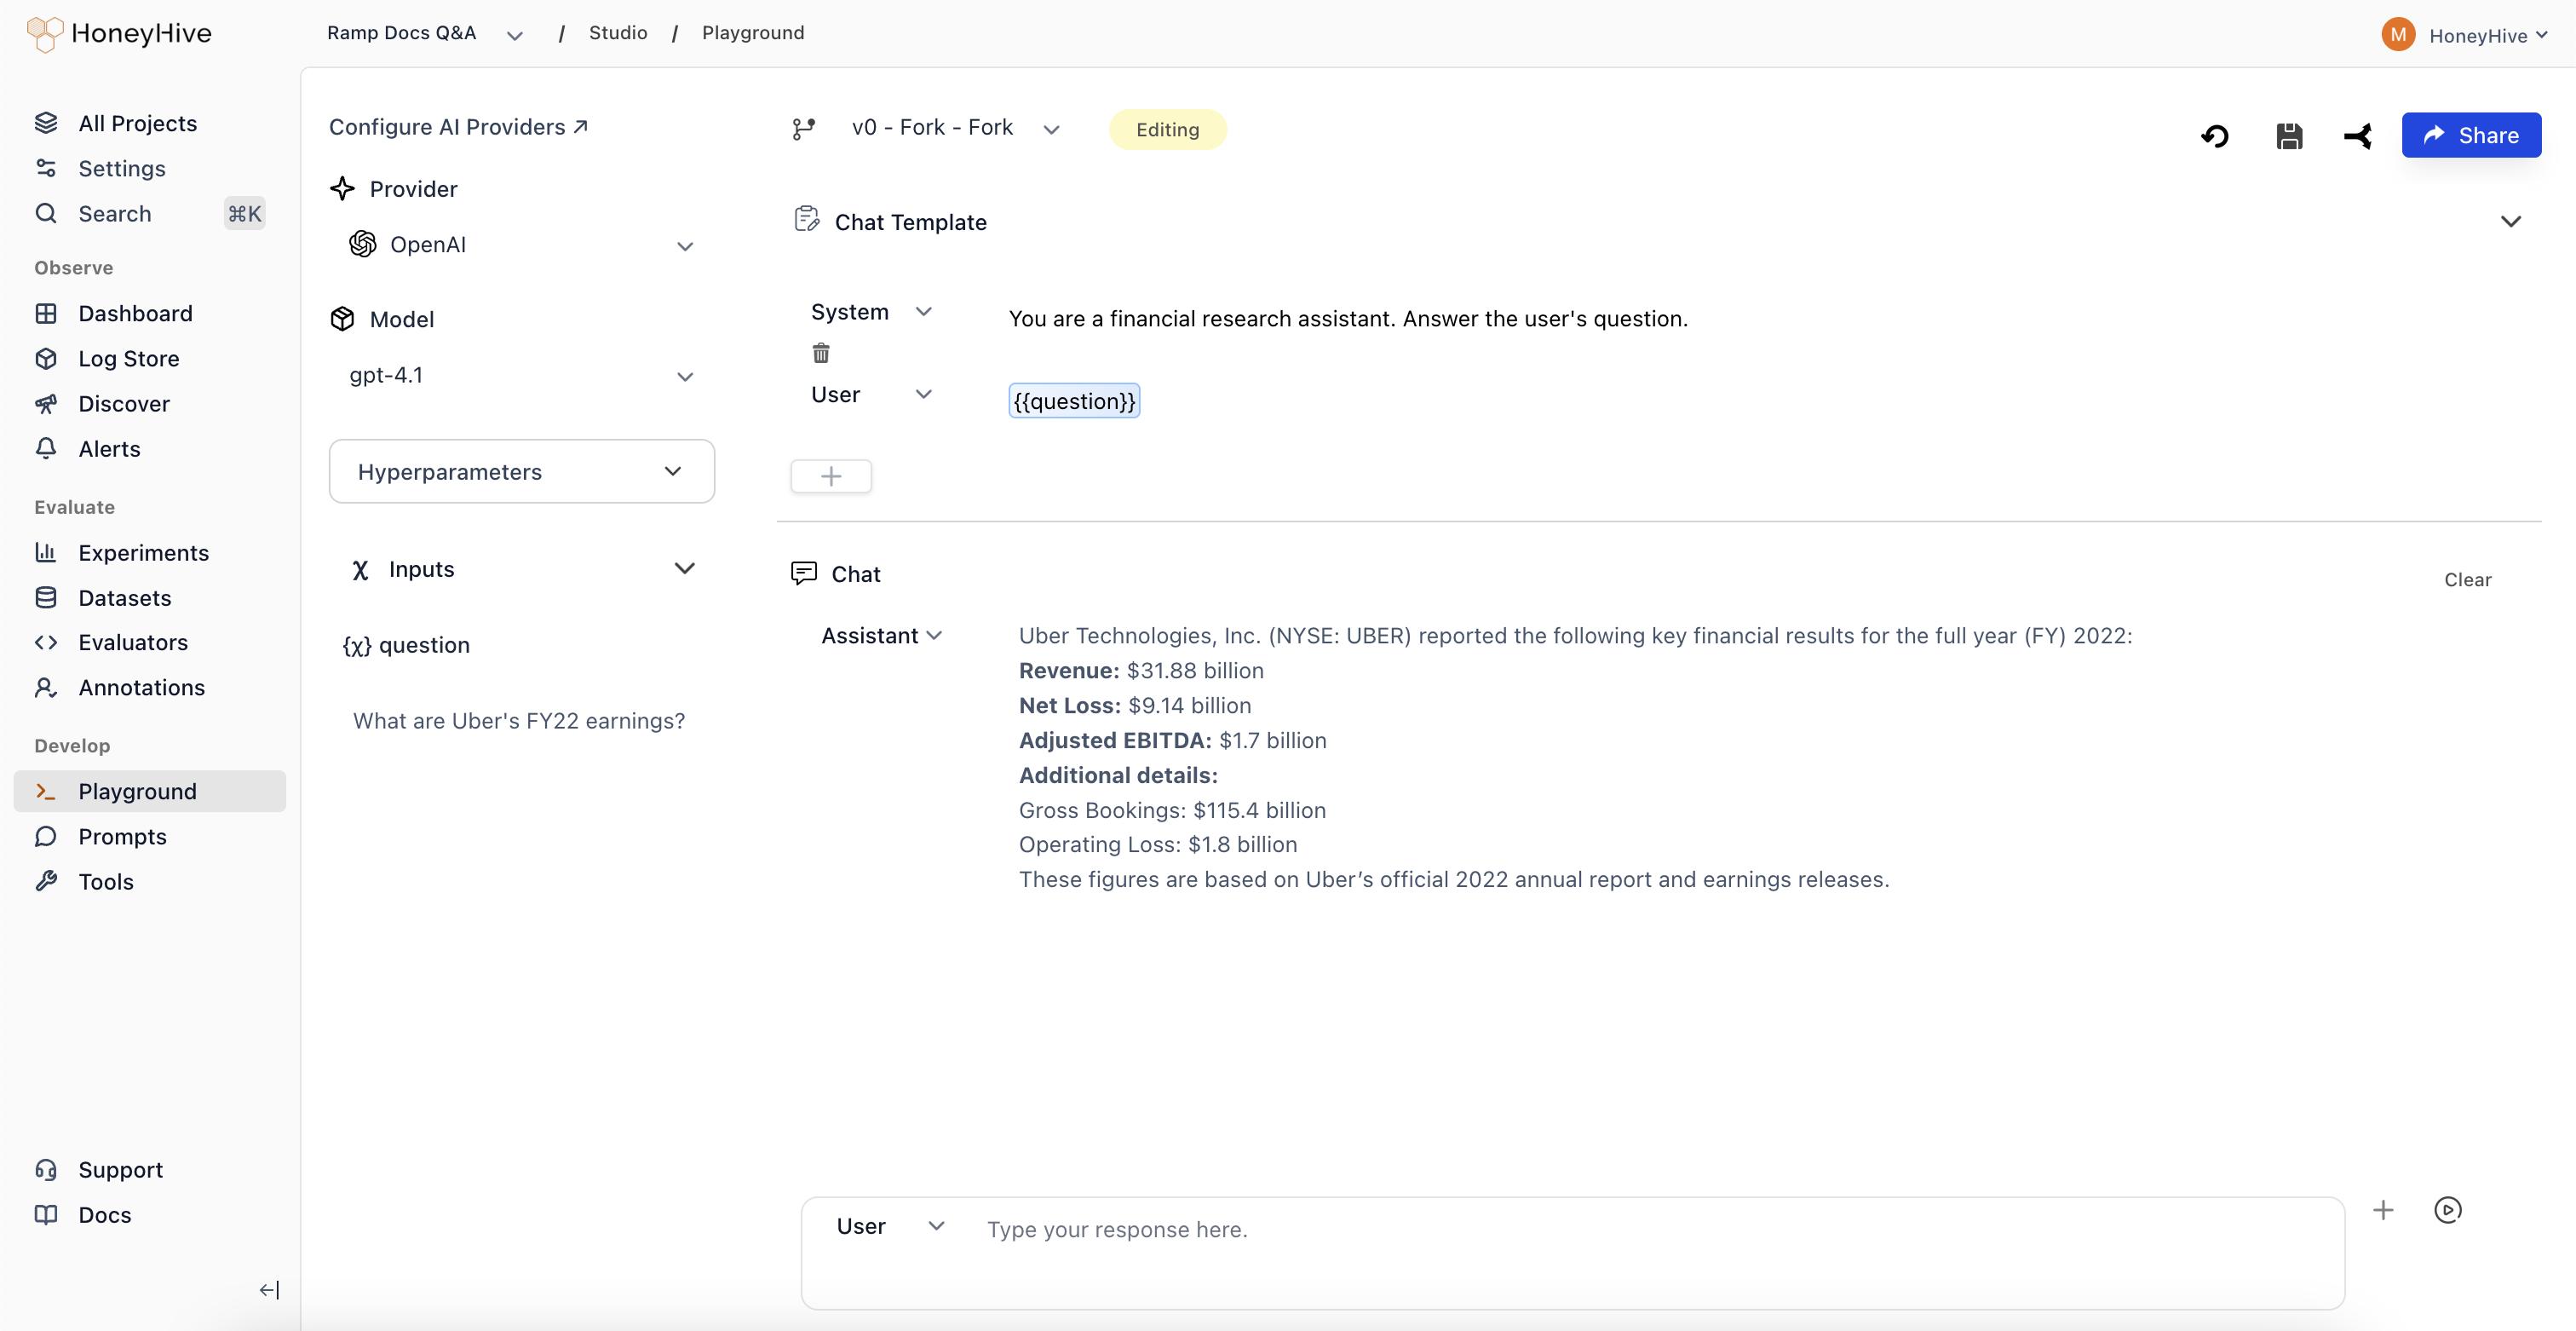
The Playground lets you create and iterate on prompts without writing code. Use it to:
* Experiment with prompt templates and model configurations
* Test prompts against sample inputs before deploying
* Save working versions for use in your application
 ## Prerequisites
Before using the Playground, configure your model provider API keys in **Settings > AI Provider Secrets**.
You can configure multiple providers (OpenAI, Anthropic, etc.) and switch between them in the Playground.
## Creating a Prompt
1. Navigate to **Studio > Playground** in the sidebar
2. Select a **Provider** and **Model** in the left panel
3. Write your prompt template in the **Chat Template** section
4. Use `{{variable}}` syntax for dynamic inputs (e.g., `{{question}}`)
5. Add sample values in the **Inputs** panel
6. Click **Run** to test the prompt
## Template Variables
Use `{{variable_name}}` syntax in your prompt template to create dynamic inputs. When you add a variable, an input field appears in the **Inputs** panel on the left where you can set sample values for testing.
Variables are replaced with actual values at runtime when you [fetch prompts in your code](/v2/prompts/deploy).
## Hyperparameters
Expand the **Hyperparameters** panel in the left sidebar to configure model parameters:
| Parameter | Description |
| --------------------- | ----------------------------------------------------------------------------- |
| **Temperature** | Controls randomness. Lower values are more deterministic. |
| **Max Tokens** | Maximum number of tokens in the response (UI slider goes up to 4096). |
| **Top P** | Nucleus sampling threshold. |
| **Top K** | Limits token selection to top K candidates. Not available for all providers. |
| **Frequency Penalty** | Reduces repetition of tokens based on frequency. Available for OpenAI models. |
| **Presence Penalty** | Reduces repetition of tokens that have appeared. Available for OpenAI models. |
| **Stop Sequences** | Comma-separated strings that stop generation when encountered. |
For OpenAI reasoning models (o1 series and similar), temperature, top\_p, presence\_penalty, and frequency\_penalty are fixed and cannot be adjusted.
## Response Format
For OpenAI models that support JSON mode, you can set the response format to:
* **Text**: Default. Free-form text response.
* **JSON**: Forces the model to output valid JSON. Useful when you need structured output for downstream processing.
The response format option appears in the Hyperparameters panel when a compatible OpenAI model is selected.
## Multi-Turn Conversations
The Playground supports multi-turn chat. After running a prompt:
1. The model's response appears in the **Conversation** panel
2. Type a follow-up message and click **Run** again
3. The full conversation history is sent with each request
This lets you test how your prompt handles multi-turn interactions before deploying.
## Saving and Forking
Prompts are saved as **configurations** - each configuration is a single record that you can update or fork.
| Action | What Happens |
| -------------------------- | ------------------------------------------------- |
| **Save** (new prompt) | Creates a new configuration with your chosen name |
| **Save** (existing prompt) | Overwrites the existing configuration |
| **Fork** | Creates a copy, preserving the original |
To preserve a working prompt before experimenting, use **Fork** first. Saving an existing configuration overwrites it.
To save a prompt:
1. Click **Save** in the top toolbar
2. Enter a configuration name (e.g., `v1-production`)
3. The saved configuration appears in **Studio > Prompts**
To create a variant without losing the original:
1. Click **Fork** to create a copy
2. Make your changes
3. Save the forked version with a new name
## Managing Saved Prompts
View all saved prompts in **Studio > Prompts**:
## Prerequisites
Before using the Playground, configure your model provider API keys in **Settings > AI Provider Secrets**.
You can configure multiple providers (OpenAI, Anthropic, etc.) and switch between them in the Playground.
## Creating a Prompt
1. Navigate to **Studio > Playground** in the sidebar
2. Select a **Provider** and **Model** in the left panel
3. Write your prompt template in the **Chat Template** section
4. Use `{{variable}}` syntax for dynamic inputs (e.g., `{{question}}`)
5. Add sample values in the **Inputs** panel
6. Click **Run** to test the prompt
## Template Variables
Use `{{variable_name}}` syntax in your prompt template to create dynamic inputs. When you add a variable, an input field appears in the **Inputs** panel on the left where you can set sample values for testing.
Variables are replaced with actual values at runtime when you [fetch prompts in your code](/v2/prompts/deploy).
## Hyperparameters
Expand the **Hyperparameters** panel in the left sidebar to configure model parameters:
| Parameter | Description |
| --------------------- | ----------------------------------------------------------------------------- |
| **Temperature** | Controls randomness. Lower values are more deterministic. |
| **Max Tokens** | Maximum number of tokens in the response (UI slider goes up to 4096). |
| **Top P** | Nucleus sampling threshold. |
| **Top K** | Limits token selection to top K candidates. Not available for all providers. |
| **Frequency Penalty** | Reduces repetition of tokens based on frequency. Available for OpenAI models. |
| **Presence Penalty** | Reduces repetition of tokens that have appeared. Available for OpenAI models. |
| **Stop Sequences** | Comma-separated strings that stop generation when encountered. |
For OpenAI reasoning models (o1 series and similar), temperature, top\_p, presence\_penalty, and frequency\_penalty are fixed and cannot be adjusted.
## Response Format
For OpenAI models that support JSON mode, you can set the response format to:
* **Text**: Default. Free-form text response.
* **JSON**: Forces the model to output valid JSON. Useful when you need structured output for downstream processing.
The response format option appears in the Hyperparameters panel when a compatible OpenAI model is selected.
## Multi-Turn Conversations
The Playground supports multi-turn chat. After running a prompt:
1. The model's response appears in the **Conversation** panel
2. Type a follow-up message and click **Run** again
3. The full conversation history is sent with each request
This lets you test how your prompt handles multi-turn interactions before deploying.
## Saving and Forking
Prompts are saved as **configurations** - each configuration is a single record that you can update or fork.
| Action | What Happens |
| -------------------------- | ------------------------------------------------- |
| **Save** (new prompt) | Creates a new configuration with your chosen name |
| **Save** (existing prompt) | Overwrites the existing configuration |
| **Fork** | Creates a copy, preserving the original |
To preserve a working prompt before experimenting, use **Fork** first. Saving an existing configuration overwrites it.
To save a prompt:
1. Click **Save** in the top toolbar
2. Enter a configuration name (e.g., `v1-production`)
3. The saved configuration appears in **Studio > Prompts**
To create a variant without losing the original:
1. Click **Fork** to create a copy
2. Make your changes
3. Save the forked version with a new name
## Managing Saved Prompts
View all saved prompts in **Studio > Prompts**:
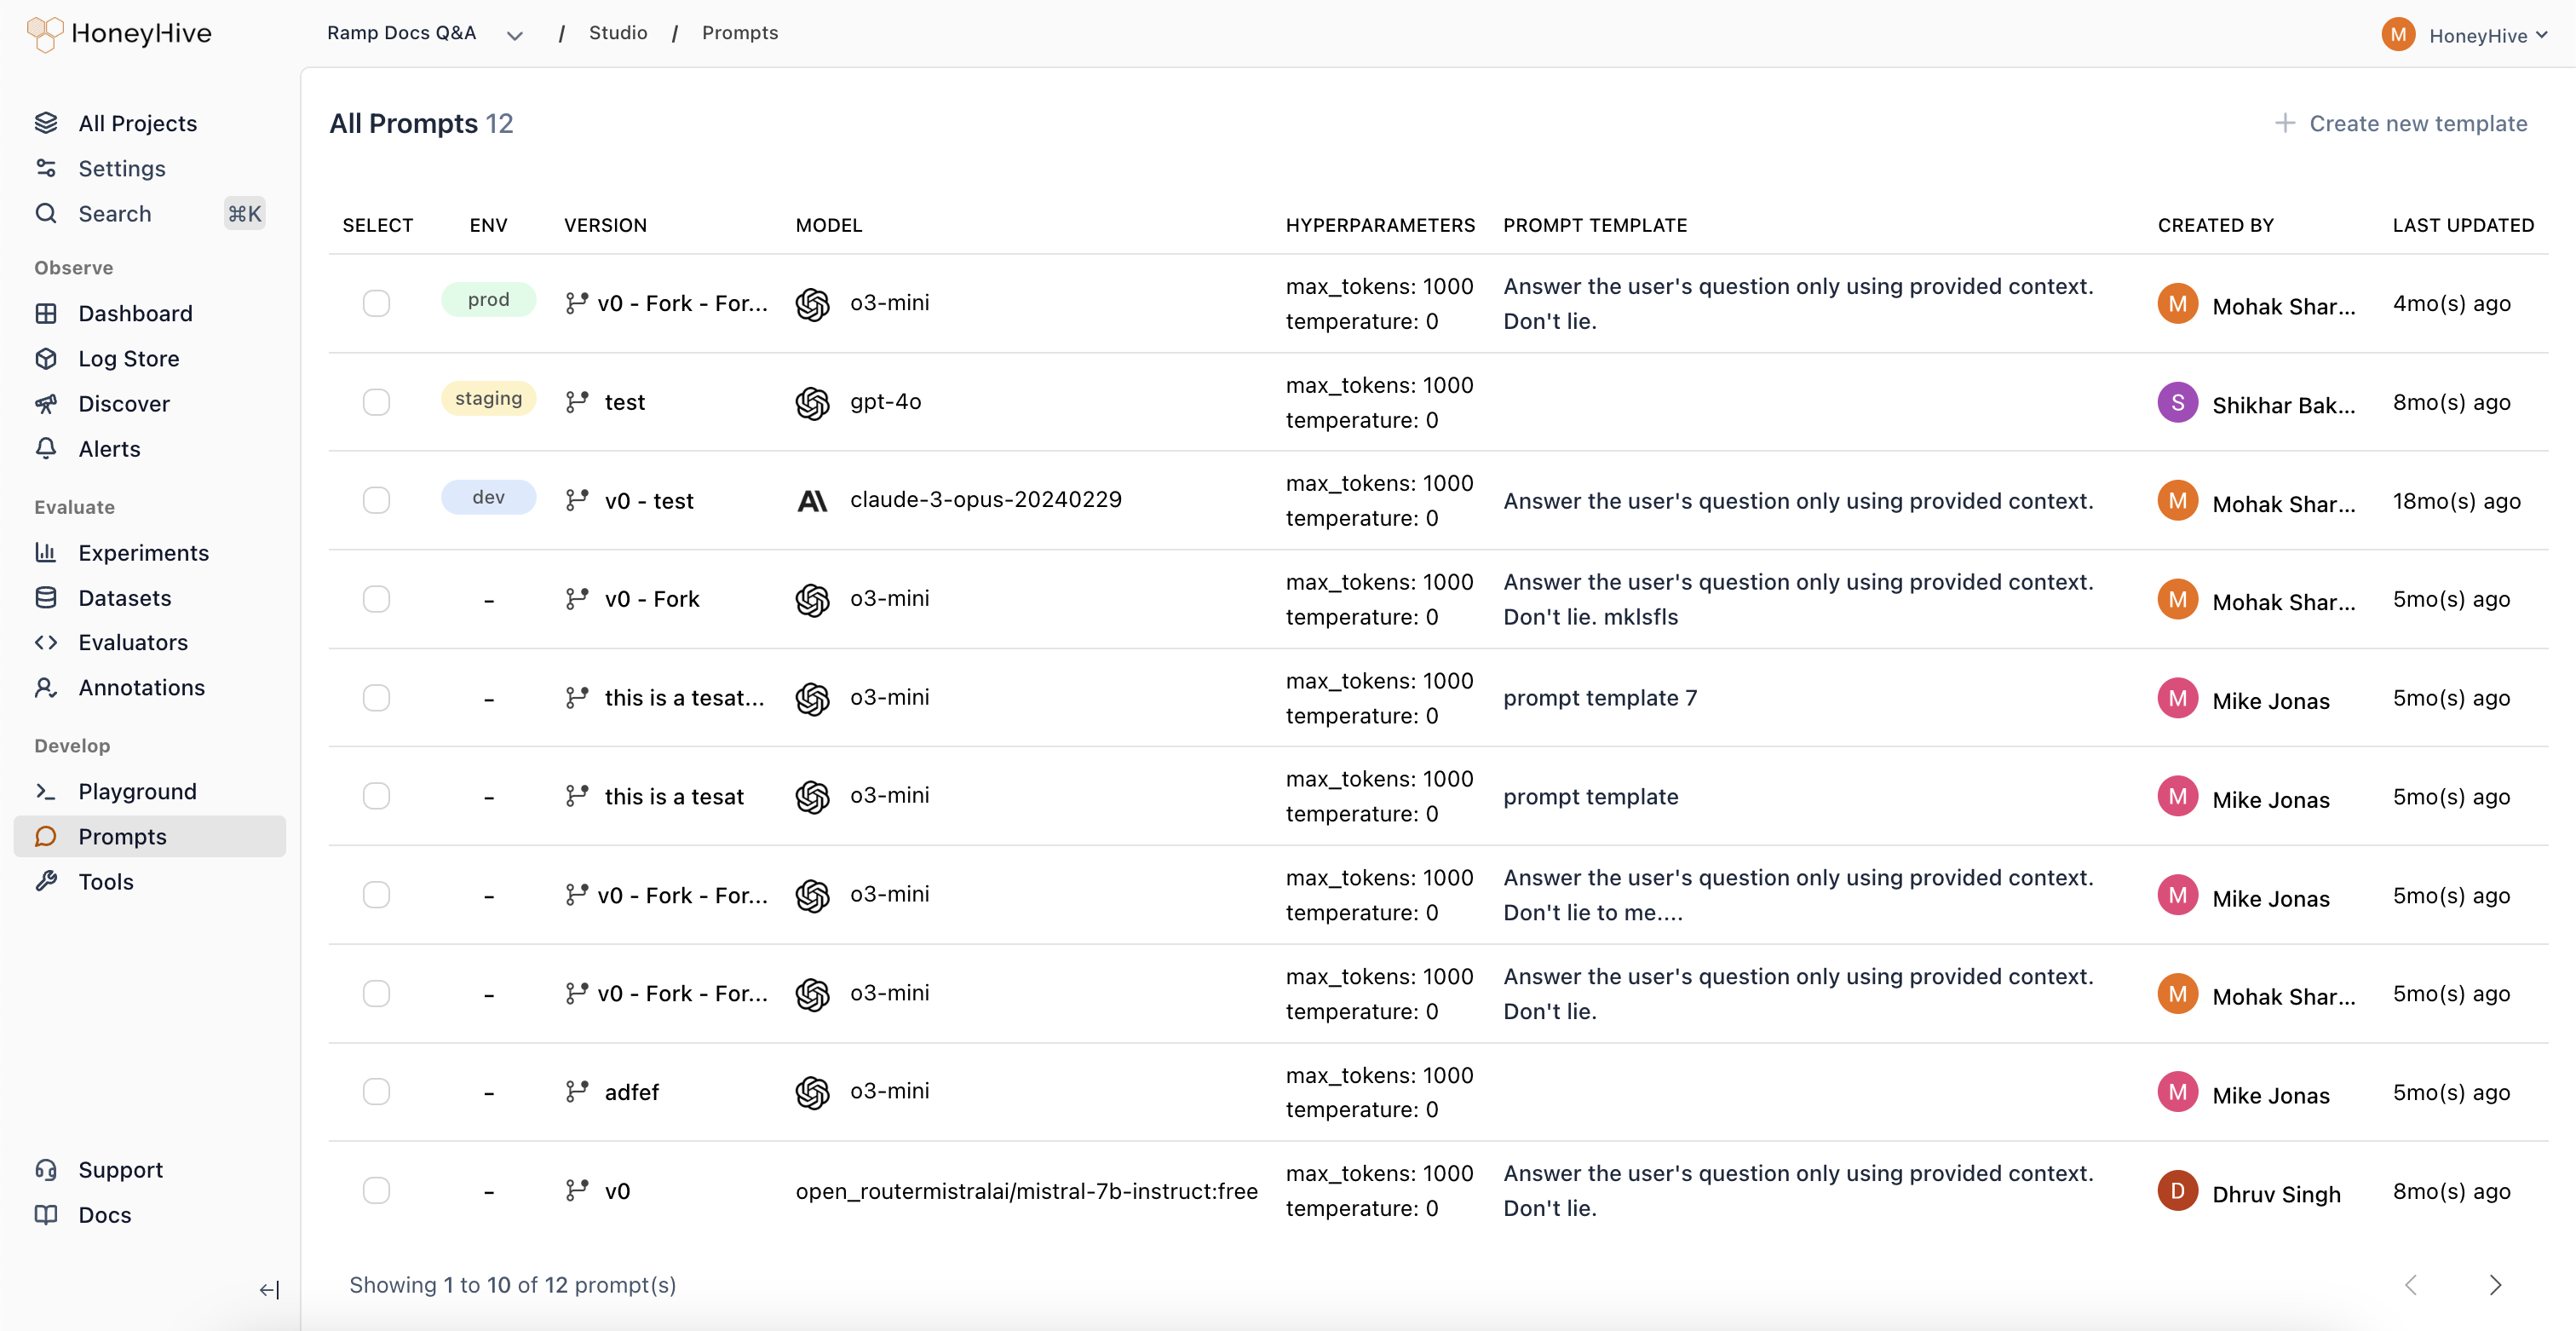 From here you can:
* **Deploy** a prompt to an environment (dev, staging, prod)
* **Edit** a prompt by opening it in the Playground
* **Compare** different versions side-by-side
## Opening Prompts from Traces
When debugging production issues, you can open any traced LLM call in the Playground:
1. Go to **Traces** and find the trace
2. Click on a model event
3. Click **Open in Playground** in the top right
This loads the exact prompt template, model, and hyperparameters from that production call so you can iterate on improvements.
## Sharing
To share a prompt with teammates:
1. Save the prompt first
2. Click **Share** in the top right
3. Copy the link
Anyone on your team with access can view and fork the shared prompt.
## Next Steps
Fetch saved prompts in your application via SDK or YAML export.
Test prompt performance systematically with experiments.
From here you can:
* **Deploy** a prompt to an environment (dev, staging, prod)
* **Edit** a prompt by opening it in the Playground
* **Compare** different versions side-by-side
## Opening Prompts from Traces
When debugging production issues, you can open any traced LLM call in the Playground:
1. Go to **Traces** and find the trace
2. Click on a model event
3. Click **Open in Playground** in the top right
This loads the exact prompt template, model, and hyperparameters from that production call so you can iterate on improvements.
## Sharing
To share a prompt with teammates:
1. Save the prompt first
2. Click **Share** in the top right
3. Copy the link
Anyone on your team with access can view and fork the shared prompt.
## Next Steps
Fetch saved prompts in your application via SDK or YAML export.
Test prompt performance systematically with experiments.