Zilliz
Zilliz is the company behind Milvus, an open-source vector database built for AI applications and similarity search. By integrating Milvus with HoneyHive, you can:
- Trace vector database operations
- Monitor latency, embedding quality, and context relevance
- Evaluate retrieval performance in your RAG pipelines
- Optimize paramaters such as
chunk_size
or chunk_overlap
Prerequisites
- A HoneyHive account and API key
- Python 3.7+
- Basic understanding of vector databases and RAG pipelines
Installation
Install the required packages:
pip install openai pymilvus honeyhive
Basic Integration Example
The following example demonstrates a complete RAG pipeline with HoneyHive tracing for Milvus operations. We’ll break down each component step by step.
Step 1: Initialize Clients
First, set up the necessary clients for HoneyHive, OpenAI, and Milvus:
from openai import OpenAI
from pymilvus import MilvusClient
from honeyhive.tracer import HoneyHiveTracer
from honeyhive.tracer.custom import trace
# Initialize HoneyHive Tracer
HoneyHiveTracer.init(
api_key="your_honeyhive_api_key",
project="your_project_name",
)
# Initialize OpenAI client
openai_client = OpenAI(api_key="your_openai_api_key")
# Initialize Milvus client
milvus_client = MilvusClient("milvus_demo.db") # Using Milvus Lite for demo
Step 2: Create Embedding Function
def embed_text(text):
"""Generate embeddings using OpenAI's text-embedding-ada-002 model"""
res = openai_client.embeddings.create(
model="text-embedding-ada-002",
input=text
)
return res.data[0].embedding
Step 3: Set Up Milvus Collection with Tracing
@trace(
config={
"collection_name": "demo_collection",
"dimension": 1536, # text-embedding-ada-002 dimension
}
)
def setup_collection():
"""Set up Milvus collection with tracing"""
# Drop collection if it exists
if milvus_client.has_collection(collection_name="demo_collection"):
milvus_client.drop_collection(collection_name="demo_collection")
# Create new collection
milvus_client.create_collection(
collection_name="demo_collection",
dimension=1536 # text-embedding-ada-002 dimension
)
The @trace
decorator logs this operation to HoneyHive with metadata about the collection name and dimension. The function itself creates a fresh collection for our vectors, with the dimension matching our embedding model’s output size.
Step 4: Insert Documents with Tracing
@trace(
config={
"embedding_model": "text-embedding-ada-002"
}
)
def insert_documents(documents):
"""Insert documents with tracing"""
vectors = [embed_text(doc) for doc in documents]
data = [
{
"id": i,
"vector": vectors[i],
"text": documents[i],
"subject": "general"
}
for i in range(len(vectors))
]
res = milvus_client.insert(
collection_name="demo_collection",
data=data
)
return res
This function converts a list of text documents into vectors using our embedding function, then inserts them into Milvus. The @trace
decorator logs information about the embedding model used, allowing you to compare different models’ performance.
Step 5: Search for Similar Documents with Tracing
@trace(
config={
"embedding_model": "text-embedding-ada-002",
"top_k": 3
}
)
def search_similar_documents(query, top_k=3):
"""Search for similar documents with tracing"""
query_vector = embed_text(query)
results = milvus_client.search(
collection_name="demo_collection",
data=[query_vector],
limit=top_k,
output_fields=["text", "subject"]
)
return [match["entity"]["text"] for match in results[0]]
Step 6: Generate Response with Tracing
Create a function to generate a response using OpenAI with tracing:
@trace(
config={
"model": "gpt-4o",
"prompt": "You are a helpful assistant"
}
)
def generate_response(context, query):
"""Generate response using OpenAI with tracing"""
prompt = f"Context: {context}\n\nQuestion: {query}\n\nAnswer:"
response = openai_client.chat.completions.create(
model="gpt-4o",
messages=[
{"role": "system", "content": "You are a helpful assistant."},
{"role": "user", "content": prompt}
]
)
return response.choices[0].message.content
Step 7: Complete RAG Pipeline with Tracing
Create a function that combines all the previous steps into a complete RAG pipeline:
@trace()
def rag_pipeline(query):
"""Complete RAG pipeline with tracing"""
# Get relevant documents
relevant_docs = search_similar_documents(query)
# Generate response
response = generate_response("\n".join(relevant_docs), query)
return response
Step 8: Run the Example
Finally, create a main function to run the example:
def main():
# Sample documents
documents = [
"Artificial intelligence was founded as an academic discipline in 1956.",
"Machine learning is a subset of artificial intelligence.",
"Deep learning is a type of machine learning based on artificial neural networks.",
"Natural Language Processing (NLP) is a branch of AI that helps computers understand human language.",
]
# Set up collection
setup_collection()
# Insert documents
print("Inserting documents...")
insert_documents(documents)
# Test RAG pipeline
query = "What is the relationship between AI and machine learning?"
print(f"\nQuery: {query}")
response = rag_pipeline(query)
print(f"Response: {response}")
if __name__ == "__main__":
main()
Advanced Configuration
Using Milvus Lite
Use Milvus Lite with local files for demo, the setup is straightforward.
milvus_client = MilvusClient("milvus_demo.db")
Using Self-hosted Milvus Server
To connect to a Milvus server, specify your server address (e.g. "http://localhost:19530"
) and "<username>:<password>"
(e.g. "root:Milvus"
) as Token in the MilvusClient.
milvus_client = MilvusClient(
uri="milvus_server_address",
token="milvus_username_and_password"
)
Connect to Zilliz Cloud
To connect to Zilliz Cloud (fully managed Milvus), add your cluster endpoint and token to the MilvusClient.
milvus_client = MilvusClient(
uri="your_zilliz_cloud_endpoint",
token="your_zilliz_api_key"
)
Add custom metadata to your traces for better analysis:
@trace(
config={
"embedding_model": "text-embedding-ada-002",
"top_k": 3,
"custom_metadata": {
"environment": "production",
"version": "1.0.0",
"dataset": "knowledge_base_v2"
}
}
)
def search_similar_documents(query, top_k=3):
# Vector search code
...
Analyzing Results in HoneyHive
After running your application with tracing enabled, you can analyze the results in the HoneyHive dashboard:
- Navigate to your project in the HoneyHive dashboard
- View traces for your Milvus operations
- Analyze retrieval performance metrics
- Compare different embedding models and configurations
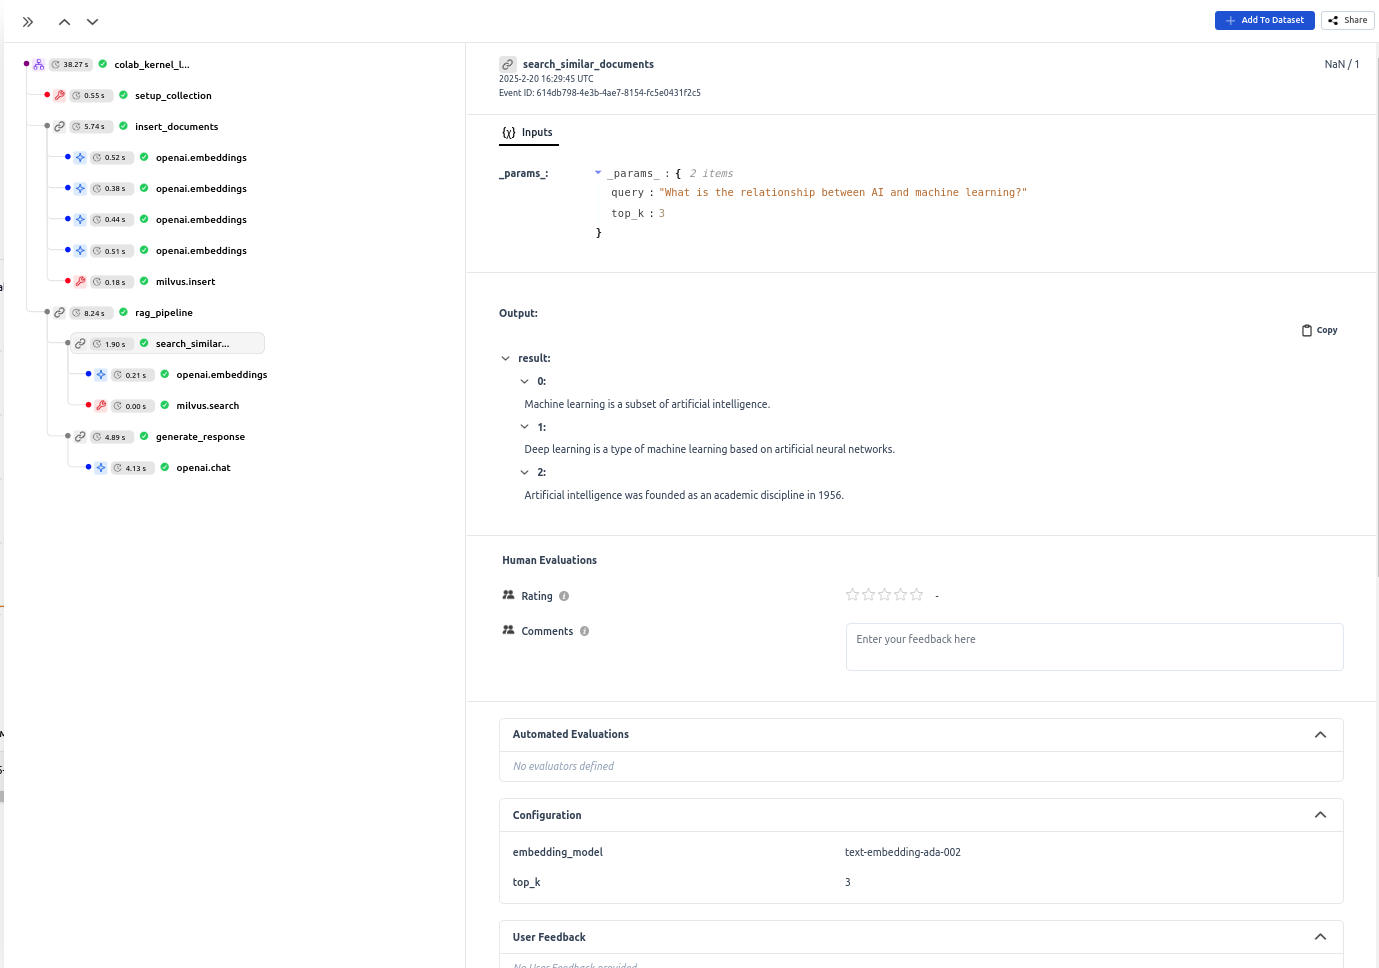
By integrating Zilliz into your workflow, you can easily track and improve the performance of your AI applications. Keep an eye on what’s working, spot issues quickly, and fine-tune your embeddings to boost accuracy
Additional Resources