In this guide, we’ll explore how to create custom LLM evaluators by defining Answer Faithfulness, an LLM evaluator that checks whether an answer generated by an LLM is faithful to the provided context fetched from a retrieval pipeline. We’ll demonstrate this in the context of a simple question-answering application over Ramp’s API docs.

Creating the evaluator

UI Walkthrough

Use the following UI walkthrough alongside the guide below to create a custom LLM evaluator in the HoneyHive console.

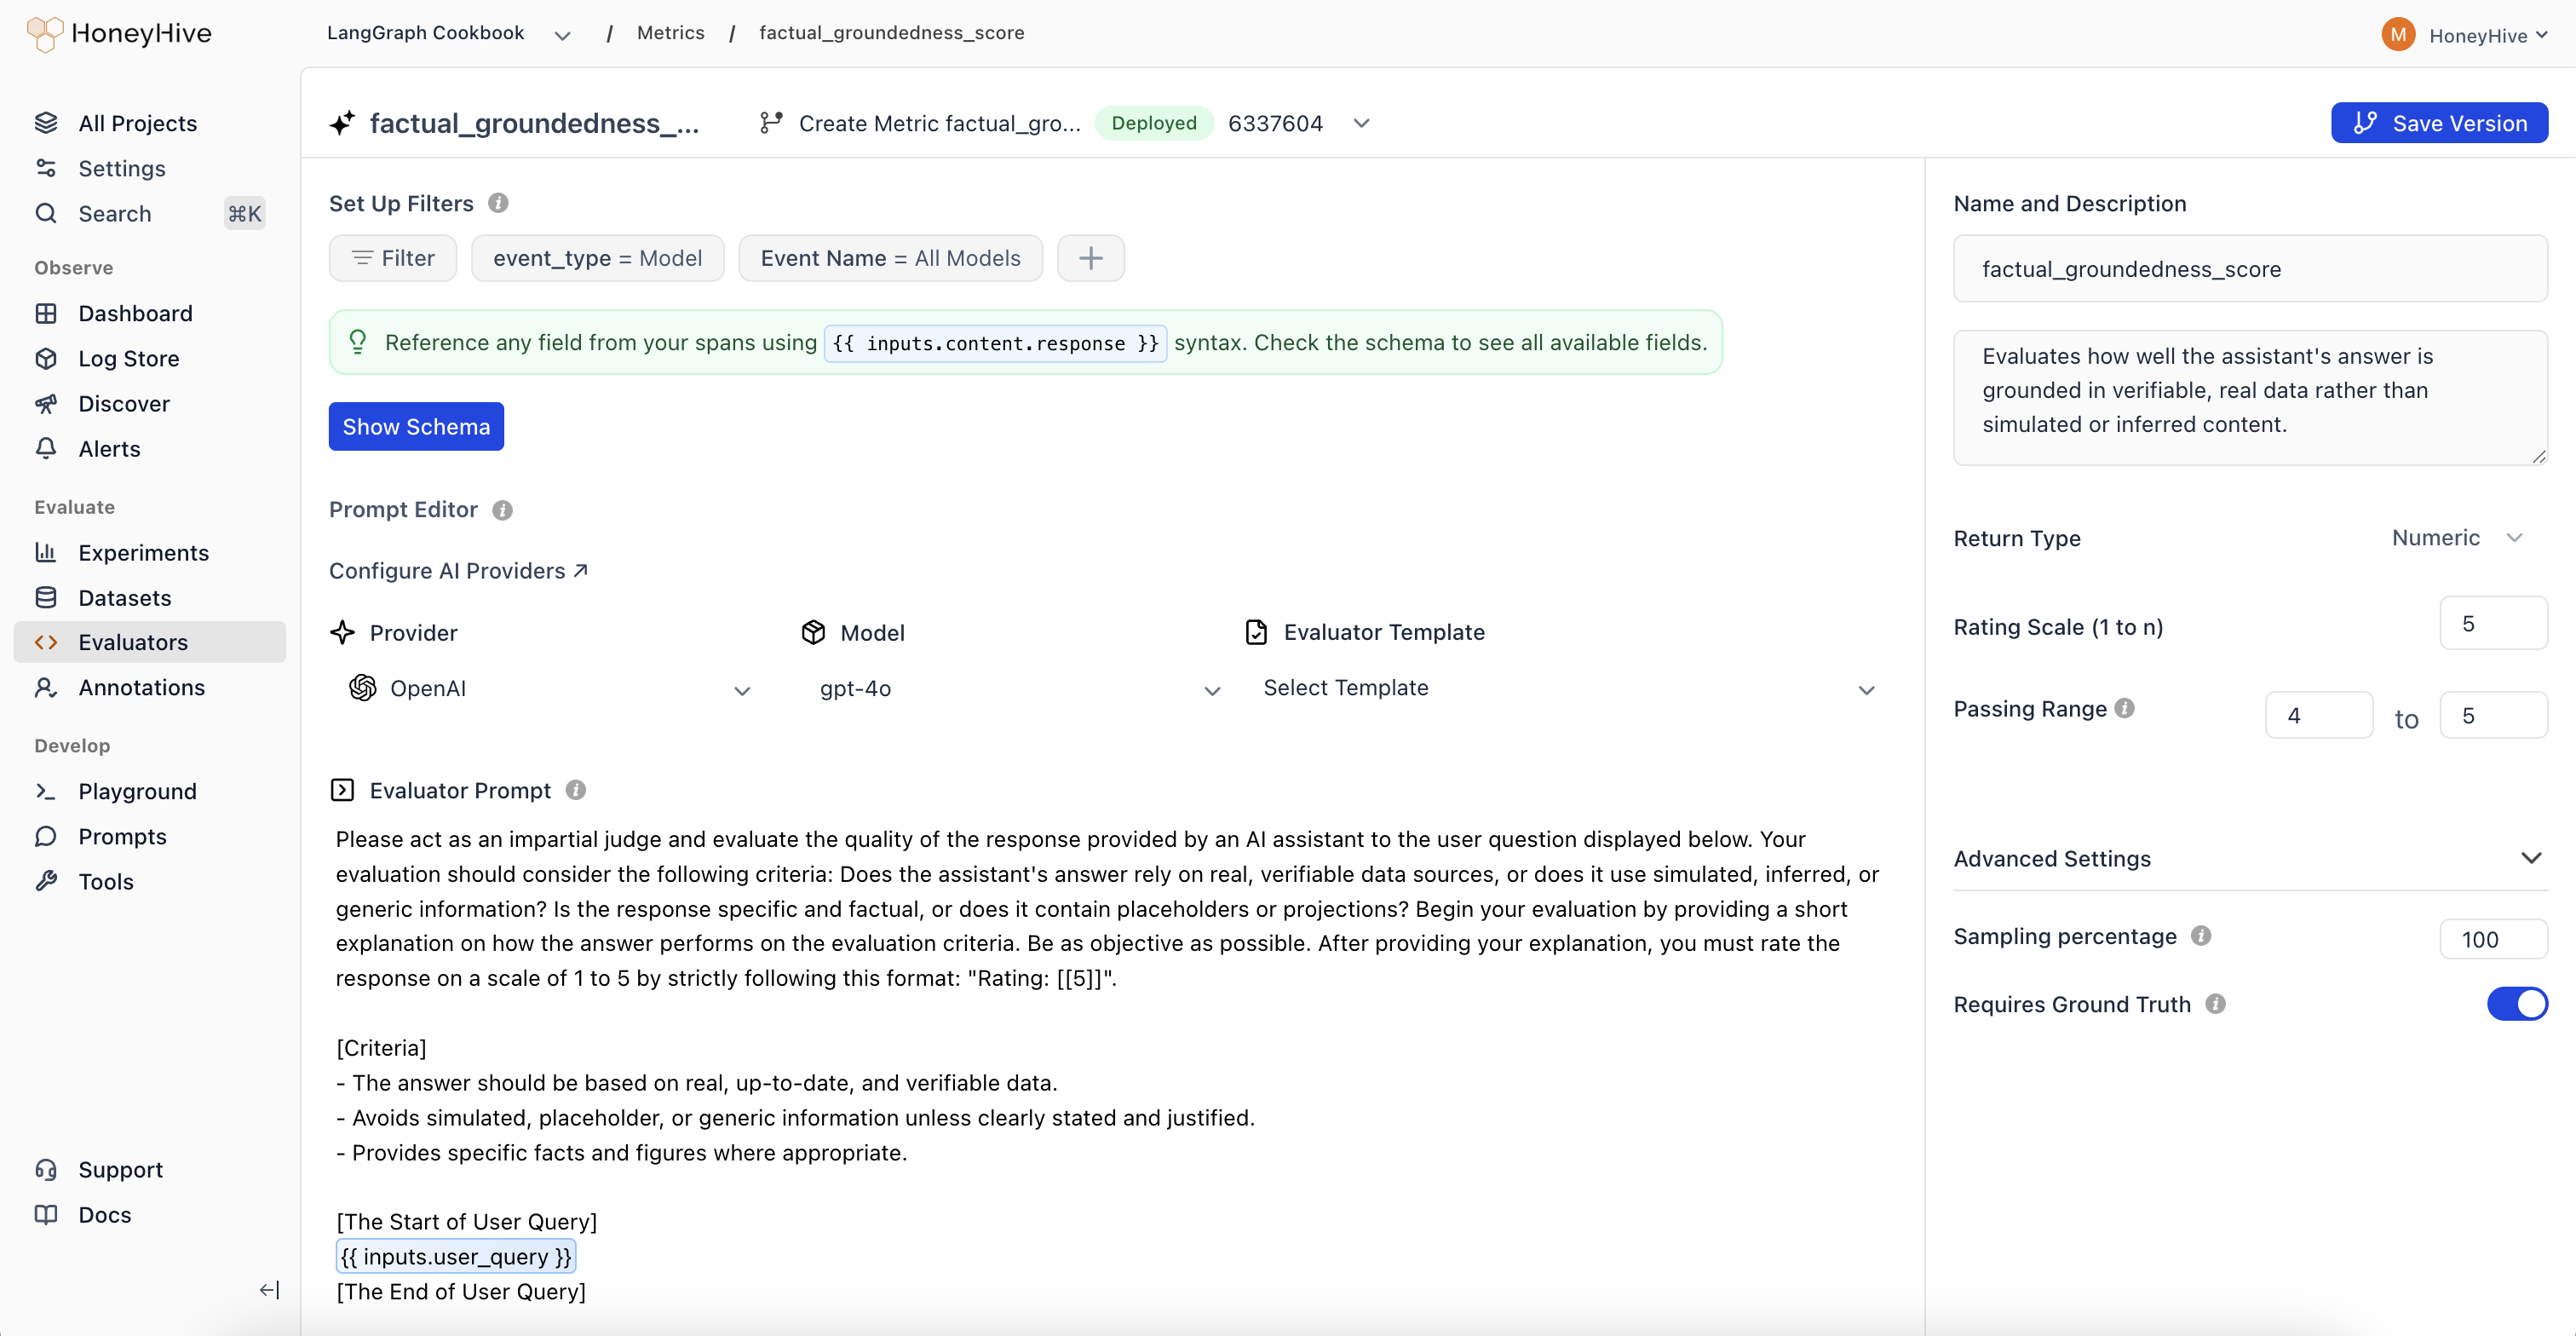
Navigating to the Evaluators tab in the left sidebar. Click Add Evaluator to create a new evaluator and select LLM Evaluator.

Understand the schema

It’s important to familiarize yourself with HoneyHive’s event and session schema in order to successfully define LLM evaluators.

The base unit of data in HoneyHive is called an event, which represents a span in a trace. A root event in a trace is of the type session, while all non-root events in a trace can be of 3 core types - modeltool and chain.

All events have a parent-child relationship, except session event, which being a root event does not have any parents.
  • session: A root event used to group together multiple model, tool, and chain events into a single trace. This is achieved by having a common session_id across all children.
  • model events: Used to track the execution of any LLM requests.
  • tool events: Used to track execution of any deterministic functions like requests to vector DBs, requests to an external API, regex parsing, document reranking, and more.
  • chain events: Used to group together multiple model and tool events into composable units that can be evaluated and monitored independently. Typical examples of chains include retrieval pipelines, post-processing pipelines, and more.
You can quickly explore the available event properties when creating an evaluator by clicking Show Schema in the evaluator console.

For this particular example, we’ll be using the below event schema. Here, the user’s query to the RAG chatbot is under inputs.question and the chunks fetched from the retrieval pipeline are under inputs.context.

{
  "event_name": "Ramp Docs Answerer",
  "event_type": "model",
  "inputs": {
    "question": "What are the different environments for the APIs?",
    "context": "Getting started\nWelcome to the Ramp API. Use the Ramp API to access transactions, issue cards, invite users, and so on.\n\nWe recommend getting started by connecting a new app and going through the request authorization documentation.\n\nFor Ramp developer partners\nIf you are a Ramp partner and want to offer your application to other Ramp customers, please contact your Ramp liaison and we will help set up your application.\n\n\nEnvironments\nThe API is available in two environments that can be accessed by sending requests to different hosts.\n\nEnvironment\nHost\nOpenAPI spec\nDescription\nProduction\nhttps://api.ramp.com\nProduction spec\nUse our production environment to go live with your application.\nSandbox\nhttps://demo-api.ramp.com\nSandbox spec ↗\nFill out this form ↗ to request a sandbox. A sandbox is a full-fledged environment in which you can explore different API endpoints and test your application.\n\n\nContact us\nHave feedback, questions, or ideas? Get in touch via email at developer-support@ramp.com ↗.\n\n\n\nRate limiting\nWe rate limit requests to preserve availability responsibly. The current limit (subject to change) is 200 requests, and gets refreshed in a 10 second rolling window.\n\nWhen the limit is reached, API calls will start getting 429 Too Many Requests responses.\n\nAfter a minute, the request limit will be replenished and you'll be able to make requests again. Note that any API calls made during this window will restart the clock, delaying the replenishment.\n\nPlease contact your Ramp liaison if you would like to request a limit increase for your account.\n\n\n\nApp connection\nAdmin user privileges required\nPlease note that only business admin or owner may register and configure the application. It is not recommended to downgrade the admin that created the app to a non-admin role.\n\n\nRegistering your application in the Ramp developer dashboard is the first step of building an integration based on Ramp API.\n\n\nFrom the Ramp developer ↗ settings page, click on Create new app to register a new application. Provide app name and app description, sign the Terms of service ↗, and click Create app.\n\n\nNow you have registered a new application. Click into it and configure the following parameters:\n\nClient ID and client secret: Credentials for your application; store securely.\nApp name and description\nGrant types: A list of grant types that the application may use to get access token. See authorization guide for more information.\nScopes: Defines scopes that may be granted to access token.\nRedirect URIs: A list of URIs telling Ramp where to send back the users in the authorization process.\nRedirect URI format\nNote that redirect URIs must either use https protocol or be in localhost.\n\n✅ https://example.com/callback is valid\n❎ http://example.com/callback is invalid\n✅ http://localhost:8000/callback is valid\n\n\n\n\nOAuth 2.0\nRamp API uses the OAuth 2.0 protocol ↗ to handle authorization and access control.\n\nWhich grant type should you use?\nIf you are a Ramp customer and your application only accesses your own Ramp data, then you can use either client credentials grant or authorization code grant. If your application is used by other Ramp customers, the authorization code grant is required.\n\nClient Credentials Grant\nClient Credentials ↗ grant can be used to get an access token outside of the context of a user. It is typically used by applications to directly access their own resources, not on behalf of a user.\n\nTo obtain a token, make a request to POST /developer/v1/token. You must include an Authorization header containing a base-64 representation of client_id:client_secret.\n\n\nShell\n\nJavaScript\n\nPython\n\ncurl --location --request POST 'https://api.ramp.com/developer/v1/token' \\\n    --header 'Authorization: Basic <base64-encoded client_id:client_secret>' \\\n    --header 'Content-Type: application/x-www-form-urlencoded' \\\n    --data-urlencode 'grant_type=client_credentials' \\\n    --data-urlencode 'scope=business:read transactions:read' \nThe response JSON payload contains a ready-to-use access_token. The Client Credentials Grant does not produce refresh tokens - you manually obtain new access tokens before the existing ones expire.\n\nAuthorization Code Grant\nThere are three parties involved in the Authorization Code flow -- the client (your application), the server (Ramp) and the user (data owner). The overall flow follows these steps:\n\nYour application sends the user to authenticate with Ramp.\nThe user sees the authorization prompt and approves the app’s request for data access.\nThe user is redirected back via a redirect_uri with a temporary authorization_code.\nYour application exchanges the authorization_code for an access_token.\nRamp verifies the params and returns an access_token.\nYour application gets a new access_token with the refresh_token.",
    "chat_history": [
      {
        "role": "system",
        "content": "\nAnswer the user's question only using provided context. Don't lie.\n\nContext: Getting started\nWelcome to the Ramp API. Use the Ramp API to access transactions, issue cards, invite users, and so on.\n\nWe recommend getting started by connecting a new app and going through the request authorization documentation.\n\nFor Ramp developer partners\nIf you are a Ramp partner and want to offer your application to other Ramp customers, please contact your Ramp liaison and we will help set up your application.\n\n\nEnvironments\nThe API is available in two environments that can be accessed by sending requests to different hosts.\n\nEnvironment\nHost\nOpenAPI spec\nDescription\nProduction\nhttps://api.ramp.com\nProduction spec\nUse our production environment to go live with your application.\nSandbox\nhttps://demo-api.ramp.com\nSandbox spec ↗\nFill out this form ↗ to request a sandbox. A sandbox is a full-fledged environment in which you can explore different API endpoints and test your application.\n\n\nContact us\nHave feedback, questions, or ideas? Get in touch via email at developer-support@ramp.com ↗.\n\n\n\nRate limiting\nWe rate limit requests to preserve availability responsibly. The current limit (subject to change) is 200 requests, and gets refreshed in a 10 second rolling window.\n\nWhen the limit is reached, API calls will start getting 429 Too Many Requests responses.\n\nAfter a minute, the request limit will be replenished and you'll be able to make requests again. Note that any API calls made during this window will restart the clock, delaying the replenishment.\n\nPlease contact your Ramp liaison if you would like to request a limit increase for your account.\n\n\n\nApp connection\nAdmin user privileges required\nPlease note that only business admin or owner may register and configure the application. It is not recommended to downgrade the admin that created the app to a non-admin role.\n\n\nRegistering your application in the Ramp developer dashboard is the first step of building an integration based on Ramp API.\n\n\nFrom the Ramp developer ↗ settings page, click on Create new app to register a new application. Provide app name and app description, sign the Terms of service ↗, and click Create app.\n\n\nNow you have registered a new application. Click into it and configure the following parameters:\n\nClient ID and client secret: Credentials for your application; store securely.\nApp name and description\nGrant types: A list of grant types that the application may use to get access token. See authorization guide for more information.\nScopes: Defines scopes that may be granted to access token.\nRedirect URIs: A list of URIs telling Ramp where to send back the users in the authorization process.\nRedirect URI format\nNote that redirect URIs must either use https protocol or be in localhost.\n\n✅ https://example.com/callback is valid\n❎ http://example.com/callback is invalid\n✅ http://localhost:8000/callback is valid\n\n\n\n\nOAuth 2.0\nRamp API uses the OAuth 2.0 protocol ↗ to handle authorization and access control.\n\nWhich grant type should you use?\nIf you are a Ramp customer and your application only accesses your own Ramp data, then you can use either client credentials grant or authorization code grant. If your application is used by other Ramp customers, the authorization code grant is required.\n\nClient Credentials Grant\nClient Credentials ↗ grant can be used to get an access token outside of the context of a user. It is typically used by applications to directly access their own resources, not on behalf of a user.\n\nTo obtain a token, make a request to POST /developer/v1/token. You must include an Authorization header containing a base-64 representation of client_id:client_secret.\n\n\nShell\n\nJavaScript\n\nPython\n\ncurl --location --request POST 'https://api.ramp.com/developer/v1/token' \\\n    --header 'Authorization: Basic <base64-encoded client_id:client_secret>' \\\n    --header 'Content-Type: application/x-www-form-urlencoded' \\\n    --data-urlencode 'grant_type=client_credentials' \\\n    --data-urlencode 'scope=business:read transactions:read' \nThe response JSON payload contains a ready-to-use access_token. The Client Credentials Grant does not produce refresh tokens - you manually obtain new access tokens before the existing ones expire.\n\nAuthorization Code Grant\nThere are three parties involved in the Authorization Code flow -- the client (your application), the server (Ramp) and the user (data owner). The overall flow follows these steps:\n\nYour application sends the user to authenticate with Ramp.\nThe user sees the authorization prompt and approves the app’s request for data access.\nThe user is redirected back via a redirect_uri with a temporary authorization_code.\nYour application exchanges the authorization_code for an access_token.\nRamp verifies the params and returns an access_token.\nYour application gets a new access_token with the refresh_token.\n    "
      },
      {
        "role": "user",
        "content": "What are the different environments for the APIs?"
      }
    ]
  },
  "outputs": {
    "content": "The Ramp API is available in two environments:\n\n1. Production: This environment can be accessed by sending requests to <https://api.ramp.com>. It is the recommended environment for going live with the application.\n2. Sandbox: This environment can be accessed by sending requests to <https://demo-api.ramp.com>. It is a full-fledged environment that allows you to test different API endpoints without affecting your live application."
  }
}

Set event filters

You can choose to compute your evaluator over a specific event type and event name, or over all sessions or a particular session name if you’re looking to evaluate properties that are spread across an entire trace.

In this example, we want this evaluator to be computed over only the Ramp Docs Answerer event, therefore we’ll select the model event type and compute this over Ramp Docs Answerer event name.

Define the evaluator prompt

Let’s start by defining and testing our evaluator. As stated earlier, we’ll define Answer Faithfulness, an LLM evaluator that checks whether an answer generated by an LLM is faithful to the provided context fetched from a retrieval pipeline.

We’ll be using GPT-4 for running this evaluation and pass inputs.answer and inputs.context from our LLM request to evaluate. See prompt below.

Using event properties in LLM evaluator template: You can use the event schema to insert any event properties in the prompt template. Simply wrap the property name around curly brackets {{ }} to insert the desired property in the prompt template. Example: {{inputs.context}}. You can also simple copy any properties from the schema by clicking over the property value under Show schema.
[Instruction]
Please act as an impartial judge and evaluate the quality of the answer provided by an AI assistant based on the context provided below. Your evaluation should consider the mentioned criteria. Begin your evaluation by providing a short explanation on how the fetched context from the retriever performs relative to the user's query. Be as objective as possible. After providing your explanation, you must rate the response on a scale of 1 to 5 by strictly following this format: "[[rating]]", for example: "Rating: [[5]]".

[Criteria]
The answer generated by the AI assistant should be faithful to the provided context.

[The Start of Provided Context]
{{inputs.context}}
[The End of Provided Context]

[The Start of AI Assistant's Answer]
{{outputs.content}}
[The End of AI Assistant's Answer]

[Evaluation With Rating]

We’ll simply copy and paste the above code in the evaluator console. See below.

Configuration and setup

Configure return type

Since our evaluator function returns value between 1-5, we’ll configure it as Numeric.

Configure passing range

Passing ranges are useful in order to be able to detect which test cases failed in your evaluation. This is particularly useful for defining pass/fail criteria on a datapoint level in your CI builds.

We’d ideally want the model to score 4 or 5, hence we’ll configure this as 4 to 5. This’ll allow us to account for slight errors in judgement made by the evaluator.

Enable online evaluations

Since this evaluator is a computationally expensive given it’s using GPT-4, we can choose the enable this to run in production by toggling Enable in production but will need to be vary of costs. We can minimize costs by enabling sampling.

Enable sampling

Sampling allows us to run our evaluator over a smaller percentage of events from production. This helps minimize costs while still providing valuable insights about the performance of our application. We’ll choose to set sampling percentage to 25% in this example.

Sampling only applies to events where source is not evaluation or playground, i.e. typically only production or staging environments. You can not sample events when running offline evaluations.

Validating the evaluator

Test against recent event

You can quickly test your evaluator with the built-in IDE by either defining your datapoint to test against in the JSON editor, or retrieving any recent events from your project to test your evaluator against.
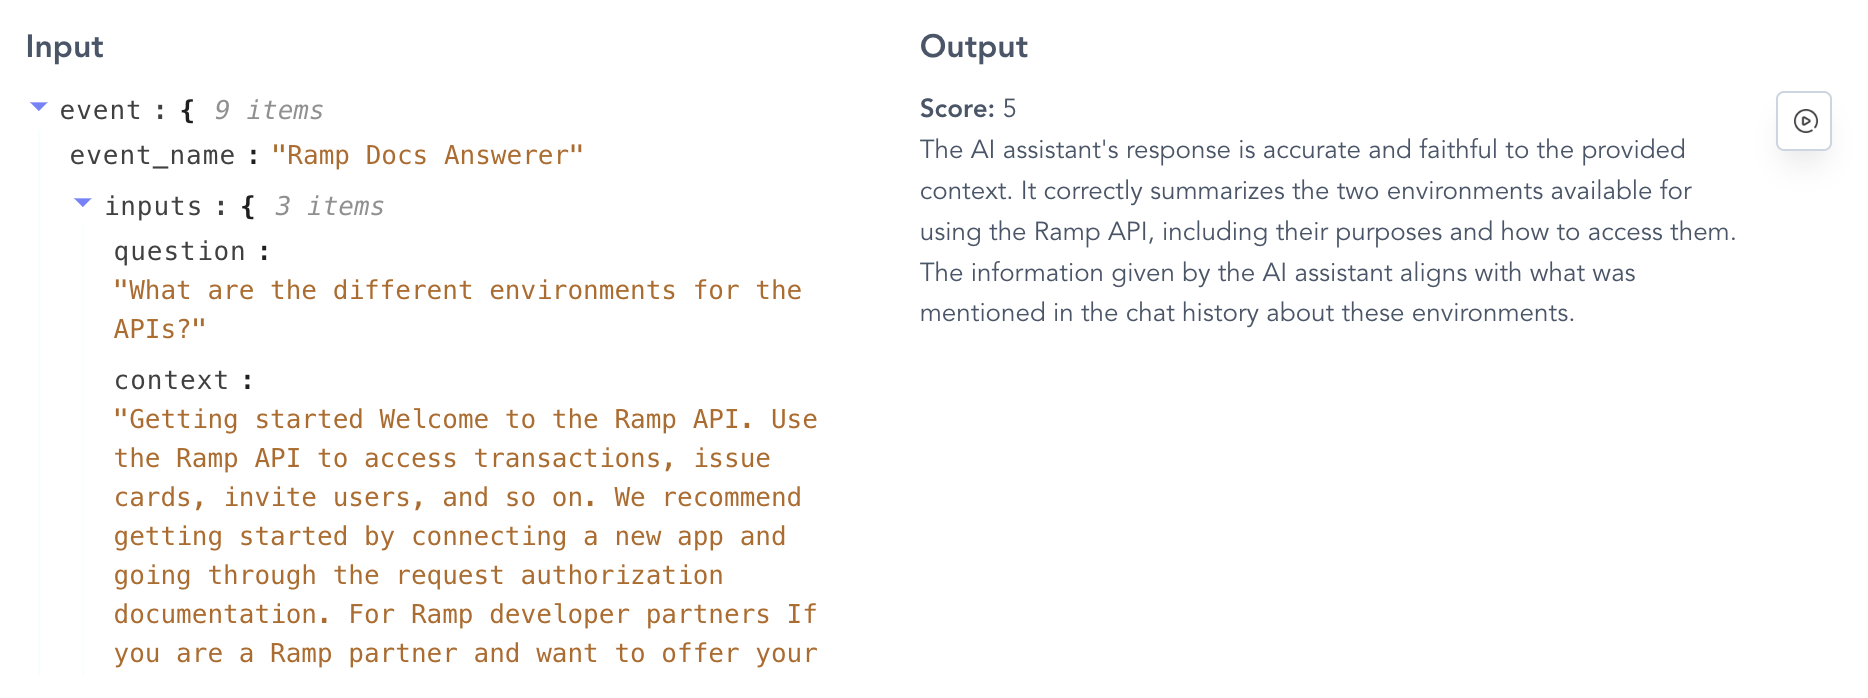
In this example, we’ll test the evaluator against the event shown above.

Congratulations! Looks like the evaluator works as expected. We can also read the explanation and validate the analysis of the evaluator ourselves.

You can now save this evaluator by pressing the Create button on the top right.